Tuesday, August 24, 2010

Moving out of your comfort zone...

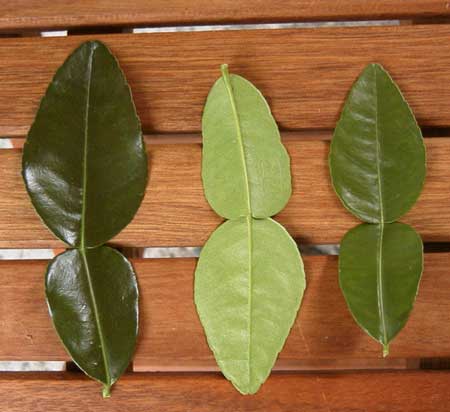
It is very easy to fall into a comfort zone when cooking, especially when you have a family and a job. Well friends...I am here to inspire you to flirt with the idea of trying new and creative things. Above you are looking at the star of today's post...the Kafir Lime Leaf. It boasts this amazingly sweet citrus lime scent and is found predominantly in Thai and Asian cooking. I discovered it when I decided to replicate my favorite store bought peanut chicken bake. *As a side note...do the same thing, feel free to experiment and make your own mixtures, you may find you like them better!
So after a quick trip to my local Whole Foods I found the leaves in a nice package waiting for my experimentation. After tonight I'm thinking, teas, simple syrup, marinades, simmering, hot baths, soups, fried rice, salads....and the list goes on and on. Try out this evening's application and see how you like it...this could be used with chicken, seafood, and vegetables!

Homemade Peanut Chicken Bake
1/4c shelled unsalted peanuts
1 Kafir Lime Leaf (torn, remove stem)
2tbs sugar
1tbs chili powder
1tbs garlic powder
1 zest of medium lemon
1/4tsp salt

Pulse peanuts in a food processor. Add remaining ingredients mixing thoroughly. Mixture should be crumbly and fine. Coat chicken or seafood and sprinkle on vegetables...

Tonight we used this on chicken that we used to top our Thai pizzas...what will you use it on?

So even if this doesn't appeal to you I'm hoping you will seek out a new ingredient to try and let me know how it worked out!

Wednesday, August 18, 2010

Fruit Pizza

It has been a ridiculously long time since I have posted and several very good friends and one husband has motivated me to finally do something about it. I struggle because I want you to be able to recreate my personal masterpieces and yet...I don't measure ingredients. I go with passion, inspiration and taste. At the end I know what I've put into things just not how much. So I payed better attention tonight so I could share this super yummy dessert.

This recipe works best if you have a pizza pan with the holes in the bottom. That pan is a blessing for SO many reasons. It cooks homemade crusts to perfection, chicken nuggets and fries without having to flip them and keeps your oven clean when you are "supposed" to put the pizza directly on the oven rack. If you don't currently own one, that is ok, just use a regular pizza pan.

1 "roll" of sugar cookie dough
1 8oz package of cream cheese (any kind) softened
1 stick of butter-softened
1 1/2 cups of confectioners sugar
1 tbls vanilla extract
1 each of: apple, peach, plum, apricot -sliced thin in wedges
1 tsp lemon juice

Preheat oven to 350. Spread the cookie dough evenly on the pizza pan and bake for 10-12 minutes or until golden brown. Remove and allow to cool. Using an electric mixer, cream together the cream cheese and the butter until smooth, add the vanilla extract and the sugar 1/2c. at a time. Slice the fruit making sure to toss the apples in the lemon juice to prevent browning. Once cookie "crust" is cool, spread the cream cheese mixture evenly. Arrange the fruit in a spiral pattern (refer to the picture above). And you're done! Very impressive for your friends and family :) And while we're at it...use whatever fruit you want, I'm gonna try berries next! You can also use this cream cheese mixture as a fruit dip or to frost 12 cupcakes, or just eat it with a spoon...bliss!

Tuesday, March 2, 2010

Creamy Dreamy Grits

I go Flying Biscuit Cafe (from the ATL but lucky to have a location in Gainesville, FL) all of the time for breakfast and found myself craving their Creamy Dreamy Grits. I could tell they were choc full of unnecessary calories and goodness. I HAD to have the recipe. A quick Google search afforded me just what I was searching for and off I went. If you love creamy, cheesy grits please try these. The best part is that they don't take long at all to make and they can be paired with sweet, savory dishes including breakfast, or dinner. I made shrimp and grits last night and YUM. Sorry there is no pic, I ate it before I could think to grab the camera.

Ingredients:

  • 6 cups water
  • 2 cups half-and-half
  • 3 teaspoons kosher salt
  • 1/4 teaspoon white pepper
  • 2 cups quick grits
  • 1 cup grated white cheddar cheese
  • 4 tablespoons unsalted butter, cubed

Instructions:

In a saucepan, combine water, half-and-half, salt and white pepper and bring to a boil. Slowly pour grits into boiling water while whisking the entire time. (Watch out for splattering; mixture is very hot.) Reduce to low heat and continue to whisk often, until thick and completely smooth, about 10 minutes.

Add cheese and stir gently until cheese melts. Whisk again to combine. Turn heat off and allow grits to rest 5 minutes. Add butter and stir until completely smooth, silky and shiny.

Best $35 I've ever spent!


These really are the coolest kitchen gadget and cooking surfaces I have ever bought. Thanks to a generous Visa gift card from my class I was able to splurge on two things I have been desperate to purchase. I was expecting to pay a lot more than I did but soon discovered that if you just take the time to look around, you will inevitably find the same thing for far less than you imagined forking out.
The first thing I was looking for was a grill pan. I currently live in a shoebox with no yard so I needed to create the grilling experience indoors. They do it on Food Network all of the time so why can't I. I headed to Target and discovered the Nordic 2 Burner Reversible Griddle Pan. It is a griddle on one side and a grill pan on the other! All you have to do is place it over two burners and go to town. The best part is that it was right around $25! Many smaller ones were a minimum of $35 and didn't offer the versatility of the griddle and the grill pan. Run out and get one NOW :).

The second thing I was intrigued by was a garlic chopper. I use fresh garlic nearly every single day and hate to chop it myself. I have a garlic press but it is a pain to clean. Enter the Chef n Garlic Zoom. You literally fill it with garlic, roll it on the counter and in less than 10 seconds you have chopped garlic. Seriously, where has this been all of my life? In the store it was hard to justify $10 for a garlic chopper but once you've used it, you'll agree that it is more than worth it.

Wednesday, February 10, 2010

Tortilla Wrapped Herb Burgers

I was on a walk with the family the other night when the smell of freshly grilled burgers wafted across my olfactory senses. I couldn't escape it's grasp and HAD to have a burger. I didn't have a grill to work with and as you can see from the picture buns so I got creative with the four tortillas we had in the pantry. I know you'll enjoy!

1 lb ground beef
1 package of Lipton Savory Herb and Garlic soup mix
1/4 cup of shredded (not grated) parmesan or romano cheese
1/2 cup extra sharp white cheddar cheese
4 large tortillas
Olive Oil for coating the pan

Combine the ground beef, soup mix, and cheese in a bowl. Divide into four burgers. Cook until done, I prefer mine to be slightly pink...but that's me ;)

Sprinkle some of the cheddar on the bottom of each of the tortillas. Place a burger on top and sprinkle with more cheddar. Fold all four sides over to create a square.

Coat pan with olive oil and heat on med.-hi, place the folded sides down until light brown, turn and cook until brown and crisp.

And there you have it! Yummy flavor packed burgers. I had to cut them in half to eat. I mostly enjoyed not messing with a bun, yet still having just enough texture to make this burger a winner!

Cherry Chocolate Cake

My birthday was this week! February 9th to be exact and my co-workers and I always celebrate with food. I'm usually in charge of cakes and since mine are (not to brag but true:) ) pretty great, I had to make my own. I chose to go with one of my favorite flavor combinations: chocolate and cherry. I top it off with some homemade whipped cream and a cherry. It's almost like a sundae in cake form!

Cake:
1 box chocolate cake mix (see box for additional ingredients, substitute water with milk and use eggs at room temperature)
1 sm box of INSTANT chocolate pudding
1 can of Cherry Pie filling

Frosting:
2 pints heavy whipping cream
2tbs confectioners sugar
2 tsp vanilla extract (clear if possible)

*optional jar of hot fudge...YUM

Pre-heat oven to 350. Grease two 9 inch cake pans. Prepare cake according to directions on the box. Substitute the water for milk and use room temperature eggs. Add in box of pudding. Beat mixture for 6 minutes on medium speed. Fold in 2/3 of Cherry Pie filling. Reserve the remainder for later. Bake for 22-28 minutes, cake is done when a tooth pick is inserted in the center and comes out clean. Cool on baking racks.

Pour whipping cream, vanilla and sugar into a chilled bowl. Beat on high until stiff peaks form. Be careful not to over beat because you'll end up with sweet butter instead : ).

Spread the bottom layer with some of the whipped cream mixture and the remaining cherries from the can of pie filling. At this point just use the cherries because the filling will ooze out of the sides. Place the top layer on the filling. Frost with the remaining whipped cream. For details like the picture I filled a piping bag with the whipped cream and used a star tip around the top and bottom of the cake.

*OPTIONAL*
You may poke holes in the cake while it is still warm and spread the hot fudge (heated up) over the bottom layer. After it cools follow the remaining steps to finish the cake.

*just FYI the cake shown was a two layer six-inch cake.


Saturday, February 6, 2010

Breakfast in a Crock Pot???


I originally came across a version of this recipe in a 5 Ingredient Fix It and Forget It book. The name was Blueberry Fancy (Leticia A. Zehr, Lowvile, NY). I'm not going to lie, I was almost averted by the idea that I might find something with this title at a family reunion but when I read what was involved I got excited really quick not to mention that it is made in a crock pot! I did change several things and the one I am going to share today doesn't have any blueberries in it. Note that the fruit and flavors of the cream cheese in the recipe are interchangeable, just use what you like. Today I'm working with strawberries and pineapple cream cheese. I've used strawberries and blueberries with strawberry cream cheese in the past and YUM! I have also used the original recipe which called for plain cream cheese. I don't recommend this because it is too tangy and there isn't enough sweetness from the blueberries (or fruit of choice) to cut it. FYI I'm still trying to find an appropriate name for this...comment if you come up with something!


1 loaf French or Italian Bread cubed, divided
1 pint of strawberries, sliced (frozen is fine)
8 oz pineapple cream cheese divided
6 eggs (beaten)
2 cups of milk
1 tsp vanilla
2tbs granulated sugar

1. Beat the eggs, milk, vanilla and sugar in a separate bowl
2. Place half of the bread cubes in the bottom of the crock pot
3. Sprinkle half of the strawberry slices over top of the bread
4. Drop teaspoonfuls of the pineapple cream cheese over the strawberries using half of the container.
5. Pour half of the egg mixture over the layers.
6. Repeat all three layers
7. Cover and cook on low until the dish is set, between 3 and 4 hours.

*I am looking to cook this in the oven to speed things up. I'll update you when I come up with temperature and cooking time. Also if you're feeling adventurous feel free to beat the cream cheese into the egg mixture. I would imagine it smooths things out and you don't end up with a big bite of cream cheese and nothing else...not that it would be so bad ;)

*** UPDATE***
The oven version was a SUCCESS. I even took my advice and beat the cream cheese into the egg mixture. I tested it out on our guest this morning. I guess he liked it because he got two helpings. Just follow the directions above except you need to preheat the oven to 400, layer the ingredients in a 13x9 pan and bake for 25 minutes or until set.